EnterprisePricing
In today's fast-paced business world, efficiency and productivity are the keys to success. Managing your time effectively is crucial, and this is especially true when it comes to project management. It's often said, "Time is money," and no one understands this better than project managers and small business owners. That's why this tutorial is geared towards helping you maximize productivity by tracking time spent on projects using Noloco and Airtable.
If you're new to these tools, let's quickly introduce them. Noloco is a no-code platform that allows you to build custom applications for your business needs without the need to write code. Airtable, on the other hand, is a cloud collaboration service that functions as a spreadsheet-database hybrid, combining the features of a database with the flexibility of a spreadsheet.
In this tutorial, we will guide you on how to create a new Noloco app and create an Airtable base for effective time tracking.
Example Use Cases
Freelancers and Consultants: Whether you're a graphic designer, a digital marketer, or a business consultant, tracking time spent on different projects and tasks is vital for billing and productivity. Using Noloco and Airtable, you can accurately monitor the time invested in various projects and tasks, ensuring fair billing and providing insights into your work patterns.
Small Business Teams:
Small businesses often juggle multiple projects simultaneously. By using these tools, teams can track time spent on different aspects of a project, leading to better resource allocation, increased productivity, and improved project planning in the future.
Non-Profit Organizations:
Non-profits can utilize this combination to track volunteer hours spent on different initiatives or to manage the time invested in various organizational activities.
Educational Institutions:
Teachers and educators can monitor the time students spend on different assignments or track the time invested in different courses or modules.
Software Development Teams:
Software teams can utilize this setup to track the time spent on different stages of the development process, like coding, testing, and debugging, providing valuable insights for future project estimations.
Stay tuned as we dive deeper into the process, providing you with a step-by-step guide on setting up your time tracking system with Noloco and Airtable.
Creating an Airtable base to track time spent on Projects or Tasks
To begin, we will walk you through how to setup an Airtable base that can track the time you, your employees or team spend on tasks, or projects. In this example, we’ll be tracking time spend on projects, but the process is the same for Tasks, assignments or anything else.
1. Create an Airtable Account
If you haven't already done so, the first step is to create an account on Airtable. Simply head to the Airtable website and follow the instructions to sign up. You'll need to provide an email address and create a password. If you’ve already got an account, skip to the next step

2. Create a New Base:
Once you're logged in, you'll need to create a new base for tracking your projects. Click on the "Create a base" button in the bottom left and choose a workspace for your base. Re-name this base 'Project Tracking'.

3. Create a Projects Table:
Within your newly created base, you will initially see a single table. Rename this table to 'Projects'. Add three fields (columns) to the table: 'Name' (text field for the project's name), 'Start Date' (date field for the project's start date), and 'Status' (single select field for tracking the project's status). You can re-use the ‘Name’ and ‘Status’ that come with the sample table, and remove any extra fields.
Fill in the table with some sample rows - it helps to understand what’s going on.
Pro tip: Ask ChatGPT for some sample data in CSV format and then import it to your Table

4. Create an Employees Table:
Next, create a new table in your base and name it 'Employees'. Add two fields to the table: 'Name' and 'Email'. These fields will be used to identify each employee. Again, delete all of the other sample fields

5. Create a Work Logs Table:
Now, create a third table named 'Work Logs'. This table will have five fields:
- 'Description' (a brief description of the work done)
- 'Start' (date/time field for the work start time)
- 'End' (date/time field for the work end time)
- 'Project' (link to another record field, linked to the Projects table, don’t link to multiple)
- 'Employee' (link to another record field, linked to the Employees table, don’t link to multiple).

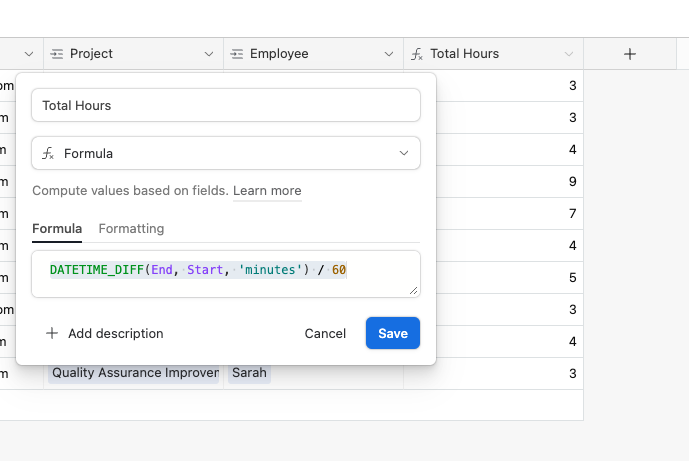
6. Add a 'Total Hours‘ Formula Field to Work Logs:
In your 'Work Logs' table, add another field named 'Total Hours’. This field should be a formula field that calculates the difference between the 'End' and 'Start' fields. This will give you the total time spent on each work log.
The final formula is: `DATETIME_DIFF(End, Start, 'minutes') / 60`
This Airtable formula gets the difference between the end time, and the start time, in minutes, then divides that by hours to get the decimal number of hours.
7. Add a 'Total Hours’ Rollup Field to Projects:
Back in your 'Projects' table, add another field named 'Total Hours'. This should be a rollup field that links to the 'Work Logs' table and sums the 'Total Hours values for each project. This will give you the total time spent on each project.


8. Add a 'Total Hours’ Rollup Field to Employees:
Similarly, in your 'Employees' table, add a rollup field named 'Total Hours’. This field should link to the 'Work Logs' table and sum the 'Total Hours’ values for each employee. This will give you the total time each employee has spent on work logs.


9. Add an 'Active Work Log' Field to Employees:
Lastly, in your 'Employees' table, add another field named 'Active Work Log'. This should be a link to another record field that connects each employee to the 'Work Logs' table. This will allow you to track which work log is currently active for each employee.

This will create a field on the Work Logs table named ‘Employees’. Rename that to ‘Active Employee’ and uncheck ‘Allow linking to Multiple records’.
This will make sure that an employee can only have one active task at any time, and that a task can only have one employee working on it at the same time.

Let’s re-cap. we have set up a base in Airtable to manage projects and work logs efficiently. We have created a Projects table, including fields for project names, start dates, and statuses. Additionally, we have set up the Work Logs table, with fields such as description, start time, end time, project linking, and employee linking. This setup lays the foundation for tracking project progress and recording work activities effectively.
Connection Airtable to Noloco to Tracking time spent on Projects or Tasks
Next, we will integrate Airtable with Noloco, to build a time tracking app, to enhance our project management capabilities. We’ll customize the the app, add action buttons to start and stop tracking time and build real-time dashboards to give an overview of where employees are spending their time and how much time each project is consuming.
1. Create a Noloco Account:
If you don't have a Noloco account yet, head over to the Noloco website and sign up. You will need to provide your name, an email address and create a password.

2. Create a New App:
After logging in, you will be directed to your dashboard. Here, you can create a new app. Click on "+ New App", select ‘Create New app’, give it a name, and choose Airtable as the data source.


3. Connect Airtable Base to the App:
On the next screen you’ll be asked to connect your Noloco account to your Airtable account. Click the connect button and follow the prompts to authorize the connection, then choose the ‘Project Tracker’ base that we just created from the dropdown. Here, you will be able to connect your newly created Airtable base with Noloco. Once that’s done, click Next, and Noloco will automatically detect your tables and columns, sync your data, and build a basic app you can customize.


4. Customize the Project Page:
Once your data source is connected, you can start customizing your app's interface. The last step in the onboarding allows you to cusomize one of your pages. Go ahead and choose ‘Projects’ if it’s not already selected, then choose the ‘Board’ layout, or whatever you prefer. Once you’re happy, click ‘Bring me to my app’ so you can customize further.

5. Add a user list to link your Airtable Employees to Noloco Accounts
Navigate to the User table in the black Admin bar, and click Sync your Users in the dropdown.
We’ll need to add a User List to your app to link your Employees table in Airtable to the Noloco Account your employees will use to login. By doing so they’ll be able to login to the app, and then you can automatically link task to their account.
Configure the user list as shown in the screenshot below, and wait for your data to resync before going back to the main app.

6. Add a 'Start Time Tracking' Action Button:
On the 'Projects' page, click into one of the projects to view all of the details of that project.

On the record page, turn on Build Mode using the switch in the bottom of the screen. With build mode enabled, clicking on the page will open up the editor sidebar. Click the page header to get the page’s configuration settings.

Click the Action Buttons menu item, as highlighted in the screenshot above, to open the action button settings. Go ahead and add a new button with the following configuration:
- Button Text: Start Task
- Under Button Settings update Modal Title to “Start a task”
Pro tip: you can use dynamic values here to say “Start working on <project_name>” - Add a new action that Creates a new record, under What Record choose work logs collection.
This will create a new Work Logs record and link it to the Project
Next we need to setup our fields.
First we’re going to add and setup the Description field.
- Make this field required
- Update the label and help text to your liking
Next we need to add and setup the Start field
- Add a default value for Dates > Today’s Date > Now which will prefill the value with the current date and time, but allow them to adjust it if they didn’t start working on the task right this instant.


The 2 few fields will be hidden.
This means they won’t be shown to the user, but instead we will set the value behind the scenes.
Add and set Employee to be hidden and set the value to be Logged in User > Employee
Similarly, add and set Active Employee and set the value to be Logged in User > Employee.
Note: the Emlpoyee field is the field you created as part of the User List setup.
The first field will link the task to the currently logged in user, and the second will set the user’s active task to the new task that we’re creating.
And just like that, we’ve got an action button that tracks when someone starts working on a task for a given project.

7. Add a list of work logs to the project view
The easiest way to test if this button works is to add a table of work logs linked to the project we’re working on.
To do this, make sure Build Mode is enabled, and scroll to the bottom and choose Collection.
Then in the Sidebar choose Work Logs as the list type and add a Filter for work logs collection

Now when you test your Action button, you will see the form with the empty description, and pre-filled time presented to the user. And after submitting, you can see that it’s created and linked to the project and the Employee (you).


7. Add a 'Stop Time Tracking' Action Button:
This is where it really gets interesting.
Head over to the Workflows section of your app. Create a new Work Log workflow, update the name and change the trigger to On Update. To only run the workflow when the End field is updates, we can Watch that field. You can enable the workflow too.

After the End value is updated, we want to unlink this task from the Employees ‘Active task’
To do that add an Update a record action. Choose Employee as the collection to update
For the ID choose Work Logs > Employee > ID`
Then set Active Task to empty value. This will unlink the two.

Back in your app, navigate back to the project page we were previously on.
With Build Mode enabled, click the list of Work Logs linked to the project to open the editor sidebar.
As before, add a new Record Action button. This time it will be a one-click button.

Add an action that Updates the record, by setting the End field to the current time.
Notice that we’re updating the end field, which will trigger the workflow we setup to watch that field earlier, which will tie up the rest of the automation.

Finally, to prevent mistakes, you can update the button’s visibility settings to only show when the End date is empty:

Similarly, you can update the original button to only show if the Logged in User > Employee > Active Task is empty. This will mean that no employee can start two tasks at once.
8. Add Dashboards to Track Time:
Finally, we can add dashboards to your app to visualize the time tracking data.
Go back to your app, with Build Mode enabled, click ‘Add to Sidebar’ in the Build Toolbar.
Then choose Blank Page. This will add a new page we can turn into our dashboard. Name your new Page Dashboard.

Click the Chart option to add a new chart section to your page.
The first chart type we’ll build will be around Projects, so set List Type to Projects.
Then go down and click on Chart 1, change the type to Bar Chart choose Start Date as the value for X-axis. Open the first Series settings and choose Total Hours as the value for the Y-axis and add an appropriate label.
Finally, set the Time Period to Group by Month and the Summary to Sum.
This chart will show a breakdown of time spent by projects that were started in a given month.
When you’ve added titles and axis labels, click the back button to add the next chart.
Click + Add to add a new chart, and click it to open it. Change this chart to a funnel.
Choose Status as the X-axis value and for the series choose any value (you can pick id) and then set the Summary to count.
This will display a funnel of the projects and the different states they’re in.

When you’ve that done, close the sidebar, and with Build mode still enabled, add another Chart element. This time set the list type to Work Logs.
Add another Bar Chart that tracks the Project on the X-Axis and the Sum of the Total Hours on the Y-axis. This will show the breakdown of hours by project.

Once you’ve finished setting that up, close that chart and click the Clone icon to create a copy of that chart, simply change the X-axis to Employee to create a breakdown of total time by Employee, and adjust the chart’s titles and axis appropriately.

Now you’ve got a dashboard that can tell you at a glance, how many projects are in what state, how many hours you’re spending on projects, and how many hours your employees are spending working on projects.
There’s a lot more you could do here, but that’s a great start.
Wrapping Up
After following the steps outlined in this guide, you now have an efficient system in place that seamlessly tracks time spent on projects or tasks. By creating a dedicated Airtable base, you've laid a solid foundation for your time tracking needs. This includes defining your projects, identifying your team members, and creating a system for logging work.
By integrating your Airtable base with Noloco, you've unlocked the potential of this data by bringing it to a user-friendly interface. You've added custom action buttons to start and stop time tracking, ensuring that capturing this important data is just a click away for your team. Moreover, you've created dashboards that visualize time spent by project and by employee, offering a transparent view into your team's work.
Remember, the advantages of this setup are numerous. It offers real-time tracking and transparency, minimizes manual entry, reduces errors, and allows for better project management and productivity analysis. By tracking time accurately, you can ensure fair workload distribution, identify bottlenecks, and make informed decisions about project timelines and resource allocation.
With Airtable and Noloco, you're not just tracking time—you're optimizing your business processes and empowering your team with insights that drive efficiency and productivity. Enjoy the benefits of this powerful no-code setup, and happy tracking!
Author
.png)


Our recent posts
Explore all blog posts


Your most common
questions—answered!
Who is Noloco best suited to?
+
-
Noloco is perfect for small to medium-sized service businesses like consultancies, agencies, advisory firms, as well as engineering and industrial services such as energy, construction, or any other operations-focused fields.
Do I need tech experience to use the platform?
+
-
Not at all! Noloco is designed especially for non-tech teams. Simply build your custom system using a drag-and-drop interface. No developers needed!
Is my data secure?
+
-
Absolutely! Security is very important to us. Our access control features let you limit who can see certain data, so only the right people can access sensitive information
Do you offer customer support?
+
-
Yes! We provide customer support through various channels—like chat, email, and help articles—to assist you in any way we can.
My business is growing fast—can Noloco keep up?
+
-
Definitely! Noloco makes it easy to tweak your system as your business grows, adapting to your changing workflows and needs.
Is there any training or support available to help my team get up to speed?
+
-
Yes! We offer tutorials, guides, and AI assistance to help you and your team learn how to use Noloco quickly.
Can I make changes to my app after it’s been created?
+
-
Of course! You can adjust your app whenever needed. Add new features, redesign the layout, or make any other changes you need—you’re in full control.

Ready to boost
your business?
Build your custom tool with Noloco